Triggering Workflows
Triggers allow you to define when a Workflow should run. In the Workflow Builder, you can set up various types of triggers to initiate your workflows based on different events or conditions.
If you want your Workflow to run on a consistent schedule, use a schedule trigger. If you want your Workflow to run in response to an event in another application, use an app event trigger. If you want your Workflow to run in response to a webhook request, use a universal webhook trigger.
Selecting a trigger type
When you create a new Workflow in the Workflow Builder, you will be prompted to select a trigger type. To change the trigger type of an existing Workflow, click the menu to the left of the trigger at the top of the Workflow editor and select Change step action.
Schedule triggers
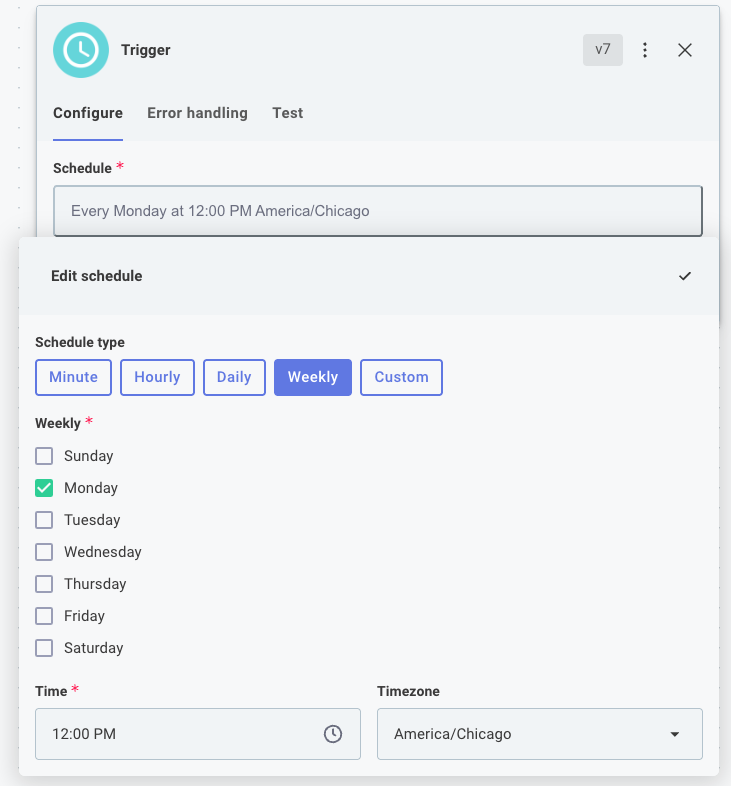
Schedule triggers allow you to run your Workflow on a regular cadence (like "every 5 minutes" or "Mondays at 8:00 AM CST"). This is useful if your Workflow should be triggered at a specific time.
To configure a schedule, click the trigger at the top of the Workflow editor and open the Configure drawer on the right side of the screen. You can then select the frequency of the trigger, such as "every 5 minutes", "every hour", or "every day at a specific time".
Tip: Use Cron expressions for advanced scheduling
You can also set up more complex schedules using cron expressions to specify exactly when the Workflow should run by selecting Custom as your Schedule type. For example, a custom schedule of
*/5 8-16 * * 1-5would cause your Workflow to run every five minutes during business hours (8:00-16:55), Monday through Friday. For help computing a cron schedule, see this Cron Calculator.
App event triggers
App event triggers run when data changes in a third-party application. For example, you may want to be notified when an Asana Project is created, updated, or deleted, or when a PagerDuty Incident occurs.
If the connector you're working with does not have a built-in app event trigger, you can use the universal webhook trigger to receive event notifications from a third-party application, or the schedule trigger to periodically check for updates from the third party.
App event triggers with webhooks
Some connectors support app event triggers that are powered by webhooks. These triggers allow your Workflow to run in response to events in the third-party application without needing to poll for updates.
Webhooks are configured automatically when you enable your workflow in the Workflow Builder. When you enable your Workflow, the runner will automatically create a webhook in the third-party application to listen for events. When an event occurs, the third-party application will send a request to your Workflow's webhook URL, triggering the Workflow to run.
Testing webhook-based app event triggers
After configuring a trigger that uses webhooks, you can test and capture webhook requests using the Test tab in the trigger's configuration drawer. You can see your Workflow's unique test webhook URLs, by clicking Webhook URLs.
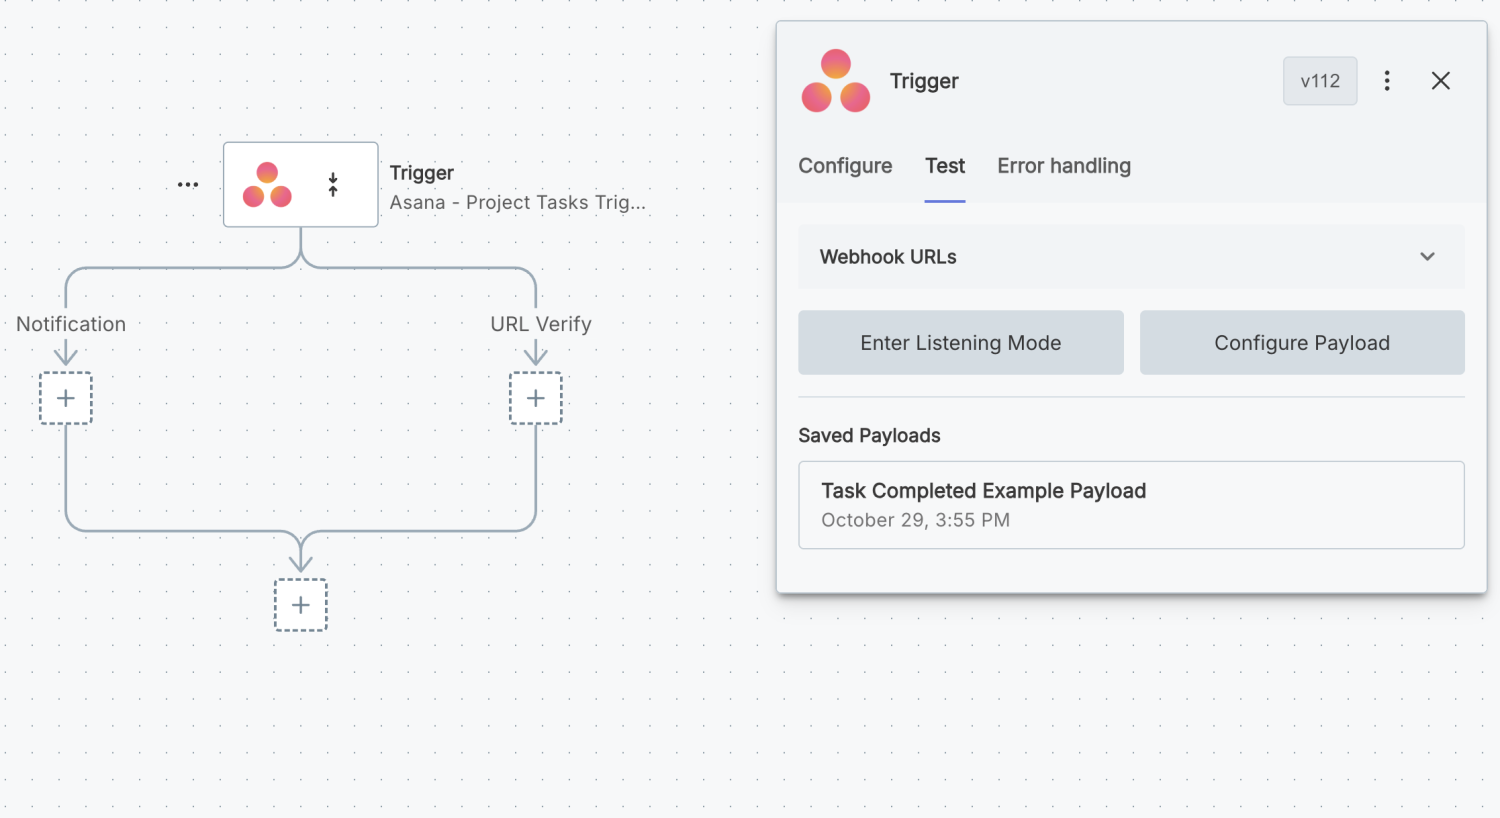
Click Enter Listening Mode to have your Workflow listen for incoming webhook requests at the test URL.
Some triggers will automatically configure webhooks in the third-party app when listening mode is enabled. Other third-party apps may require you to manually configure the webhook in their settings.
Once the webhook is configured, you can generate a test event in the third-party application to send a webhook request to your Workflow's test URL. In the example here, we marked a task as complete in Asana, which caused Asana to send a webhook request to our Workflow's test URL.
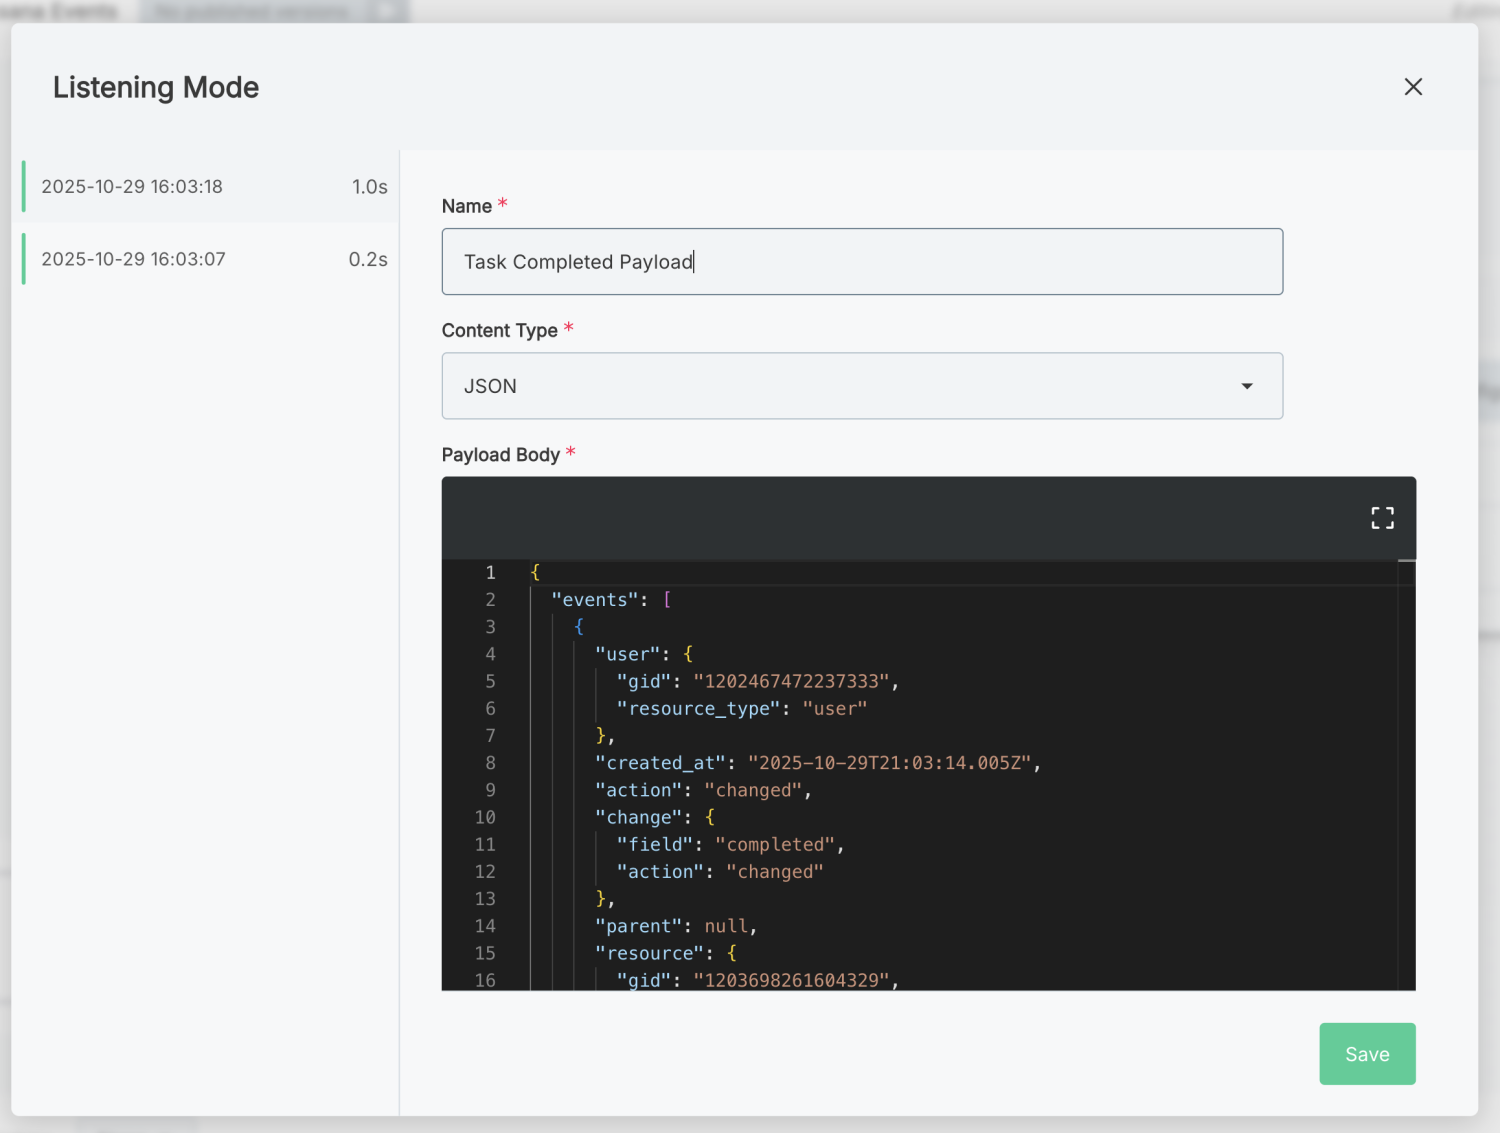
We can save the captured webhook request for use in testing our Workflow by giving it a name and clicking Save. We can then use that saved webhook request and use it later in our testing. Saved payloads are available in the Test tab of the trigger's configuration drawer under Saved Payloads, and you can run your Workflow using that payload by clicking Run button that appears when your mouse overs over the payload.
If you would like to test your Workflow with a custom webhook payload, you can click Configure Payload to edit the payload data.
App event triggers with polling
Some applications do not support webhooks, or webhook configuration is tedious. Polling triggers are useful when you want to be notified when data changes in those applications.
A polling trigger will poll an external API on a schedule that you set (for example, "every 5 minutes"), and if new data is available since the last time it polled, a full execution will run so your Workflow can process the data.
If you'd like to listen for new records in a PostgreSQL database, for example, you can use the PostgreSQL Polling Trigger to poll the database for new records every few minutes.
Universal webhook triggers
The universal webhook trigger allows you to run your Workflow in response to a webhook request from any third-party application that supports webhooks. This is useful if you want to receive real-time notifications from an application whose connector does not have a built-in app event trigger in the Workflow Builder.
What is a webhook?
A webhook is an automated message sent from one application to another when certain events occur. Webhooks let applications notify one another in real time when something has changed in one system and can be used to trigger a Workflow so the change is reflected in the other system.
A webhook consists of two main parts:
- The event that causes the webhook to fire.
The event is usually a change to a record in an application.
For example, you may have a
contact.changedorreport.createdevent. - The endpoint where information about the event is sent. The endpoint is a URL that you provide to the application that will receive the webhook.
Your Workflow's webhook URL
Your Workflow has two URLs:
- A Test URL you can use to test your webhook configuration within the Workflow Builder.
- A Live URL that is used when your Workflow is enabled and running in production.
Both URLs are available in the Test tab of your trigger's configuration drawer.
Your Workflows URLs will each be unique and will look similar to https://hooks.integrations.acme.com/trigger/SW5zEXAMPLE1234567890
Webhook request payloads
When a webhook fires, the application where the event occurred will generally send a POST request to the endpoint you provided. Most applications will send a JSON payload in the request body that contains information about the event that occurred (though some, notably Salesforce, send XML payloads).
Some payloads contain the entire record that changed, while others contain only the record's ID and you are expected to fetch the record yourself.
To test a webhook request, you can use the test URL in the Workflow Builder to send a sample payload using an HTTP client like Postman or cURL.
Posting data to a webhook URL
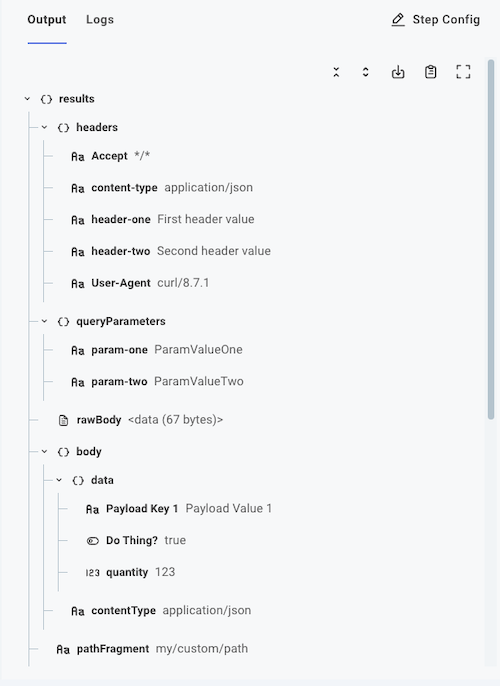
Data is typically sent as a JSON object in the request body of the webhook request, though the universal webhook trigger also parses data from the following sources:
- The request body - the JSON (or other) data sent to the webhook as an HTTP request body.
- The request headers - the HTTP headers.
- The URL path - The path to resource that follows the Workflow webhook URL.
- The URL parameters - The parameters that follow the
?in a URL.
Take, for example, this curl invocation:
curl \
'https://hooks.integrations.acme.com/trigger/SW5zEXAMPLE1234567890==/my/custom/path?param-one=ParamValueOne¶m-two=ParamValueTwo' \
--header "header-one: First header value" \
--header "header-two: Second header value" \
--header "Content-Type: application/json" \
--data '{"Payload Key 1":"Payload Value 1","Do Thing?":true,"quantity":123}'
- The request body -
{"Payload Key 1":"Payload Value 1","Do Thing?":true,"quantity":123}- is parsed (if JSON) and is accessible to the Workflow by referencing the trigger'sresults.body.data.KEY-NAME. Non-JSON payloads (like XML, images, etc.) are accessible throughresults.rawBodyand can be parsed in subsequent steps that handle that type of data. - The request headers are accessible through the trigger's
results.headers.HEADER-NAME. - The URL path -
my/custom/path- is accessible through the trigger'sresults.pathFragment. You can pass that data into the built-in split string action and split on the/character to split the URL path into an array['my','custom','path']. - The URL parameters -
?param-one=ParamValueOne¶m-two=ParamValueTwoare parsed and accessible through the trigger'sresults.queryParameters.PARAMETER-NAME.
Posting binary webhook data
If you have binary data (like an image or PDF) that you would like to post as part of your webhook invocation, you can pass that binary data as part of your request.
For example, if you have an image, my-image.png, you could invoke a test of a Workflow with:
curl 'https://hooks.integrations.acme.com/trigger/SW5zEXAMPLE1234567890' \
  --request POST \
  --header 'Content-Type: image/png' \
  --data-binary '@/path/to/my-image.png'
The binary file can be accessed by subsequent steps by referencing trigger.results.body.data.
Posting multipart webhook data
It's useful to be able to post a combination of binary and text data to a Workflow.
For example, you might want to post information about a person, as well as an avatar image of the person, to be processed by your Workflow.
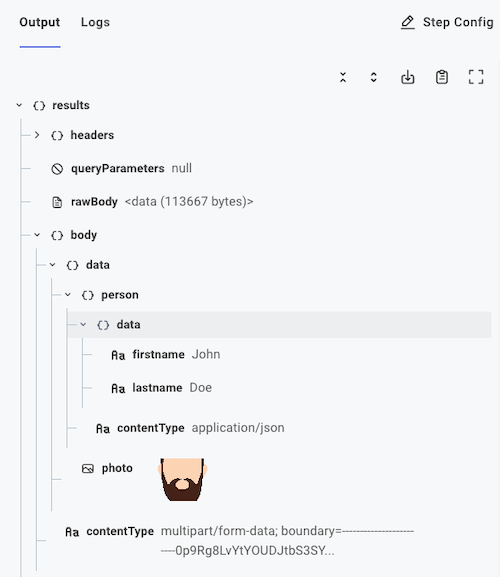
To do that, use a content type of multipart/form-data with your webhook invocation:
curl 'https://hooks.integrations.acme.com/trigger/SW5zEXAMPLE1234567890' \
  --request POST \
  --header "Content-Type: multipart/form-data" \
  --form person='{"firstname":"John","lastname":"Doe"};type=application/json' \
  --form photo=@johndoe.png
The first name in this example is accessible by referencing the trigger's results.body.data.person.data.firstname, and the avatar image is accessible by referencing results.body.data.photo.
Webhook security
Webhooks are often secured using Hashed Message Authentication Codes (HMAC) to ensure that the request is coming from an expected source. You can use the Hash connector's HMAC trigger to implement HMAC security for your webhook requests. This trigger will reject any request that is not properly signed with the expected HMAC signature.
Synchronous and asynchronous invocations
Workflows are configured by default to run asynchronously. That means that an external application makes a request to a Workflow webhook URL, but does not wait for the Workflow to finish running.
Sometimes, though, it's useful for an application to get information back from the Workflow that was invoked. In that case, you can choose to run your Workflow synchronously.
When a Workflow is invoked synchronously, the external application makes a request to the Workflow's webhook URL and waits for the Workflow to finish running before receiving a response. The caller receives an HTTP response with the results of the last step of the Workflow.
Default asynchronous webhook responses
By default, a Workflow runs asynchronously and its webhook trigger provides an HTTP code 200 ("OK") response to callers. The body of the response contains the ID of the execution that was triggered. Your request and response might look something like this:
curl \
  --data '{}' \
  --header "Content-Type: application/json" \
  'https://hooks.integrations.acme.com/trigger/SW5zEXAMPLE1234567890'

{"executionId":"SW5zdGFuY2VFeGVjdXRpb25SZXN1bHQ6OTdiNWQxYmEtZGUyZi00ZDY4LWIyMTgtMDFlZGMwMTQxNTM5"}
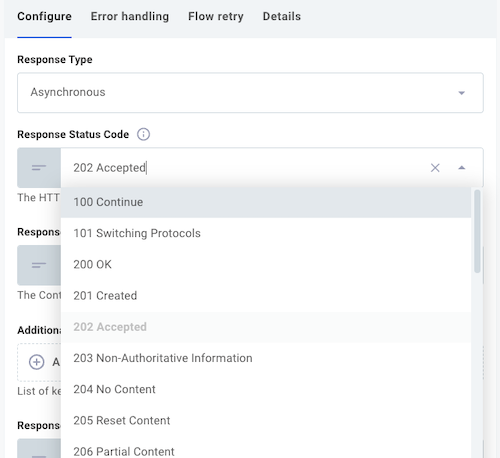
Custom HTTP responses for asynchronous webhook requests
If you would like to provide a different HTTP status code in response to a webhook request, you have two options:
-
To provide a consistent HTTP status code for all asynchronous webhook requests, configure the default response code in the Workflow Builder by clicking on the trigger at the top of the Workflow editor and opening the Configure drawer on the right side of the screen.
You can also provide a static text response body and response headers within the universal webhook trigger configuration drawer.
-
To provide a dynamic HTTP response dependent on the request, write custom JavaScript code using a Code Block Trigger.
Custom JavaScript code for a triggermodule.exports = async ({ logger, configVars }, payload) => {let response = {};if (payload.body.data.quantity > 0) {response = {statusCode: 201,contentType: "application/json",body: JSON.stringify({ status: "Created" }),};} else {response = {statusCode: 400,contentType: "application/json",body: JSON.stringify({ error: "Quantity must be positive" }),};}return { payload, response };};In this example, the response will be a 201 ("Created") status code if the
quantityin the request body is greater than 0, or a 400 ("Bad Request") status code if it is not. The response body will contain a JSON object with astatusorerrormessage.
HTTP responses for synchronous invocations
When a Workflow is invoked synchronously, the external application waits for the Workflow to finish running before receiving a response. The response will contain the results of the last step of the Workflow, usually in the form of a JSON object.
If you would like to return a custom HTTP status code, response body, or response headers, you can do so by using a Code Block step at the end of your Workflow.
module.exports = async (context, stepResults) => {
  return {
    statusCode: 202,
    contentType: "application/json",
    headers: { "X-Custom-Header": "foo" },
    body: JSON.stringify({ message: "Workflow completed successfully" }),
  };
};
Read more about using code blocks.